经过前面几章的开发,选取展示颜色、Hex/RGB色码转换的核心功能基本实现了。
但是笔者在设计App时,经常自己也不知道颜色的具体色码,只知道大概应该用哪个色系,希望能够得到同色系其他颜色的推荐。
因此,本章让我们做一个相似色推荐的功能。
子组件
相似色通常是一组,比如十个或者二十个同时出现。因此很自然的会想到定义组件进行复用。
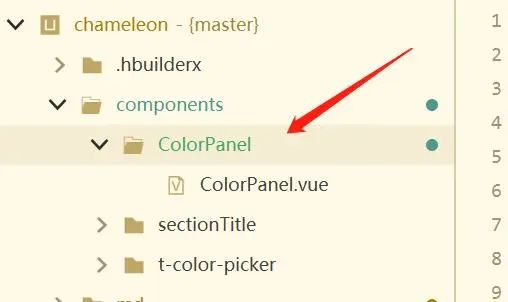
首先,创建一个叫 ColorPanel 的组件,用于展示每个单独的颜色画布:

编辑 ColorPanel.vue 文件,首先是模板:
<!-- components/ColorPanel/ColorPanel.vue -->

<template>
  <view>
    <view class="panel container" :style="panelColor">
      <view :style="canvasHexStyle" @click="onClickCanvas">
        <view class="">
          #{{hex}}
        </view>
        <view class="rgb-text">
          {{rgb.r}},{{rgb.g}},{{rgb.b}}
        </view>
      </view>
    </view>
  </view>
</template>

...
很简单,定义了一个带背景色的方块,里面的文字展示了背景色的色码。
然后是脚本部分:
// components/ColorPanel/ColorPanel.vue

...

<script>
  export default {
    name: "ColorPanel",
    props: {
      hsb: {
        type: Object,
      },
    },
    methods: {
      /**
       * hsb 转 rgb
       * @param {Object} 颜色模式  H(hues)表示色相,S(saturation)表示饱和度,B(brightness)表示亮度
       */
      HSBToRGB(hsb) {
        let rgb = {};
        let h = Math.round(hsb.h);
        let s = Math.round((hsb.s * 255) / 100);
        let v = Math.round((hsb.b * 255) / 100);
        if (s == 0) {
          rgb.r = rgb.g = rgb.b = v;
        } else {
          let t1 = v;
          let t2 = ((255 - s) * v) / 255;
          let t3 = ((t1 - t2) * (h % 60)) / 60;
          if (h == 360) h = 0;
          if (h < 60) {
            rgb.r = t1;
            rgb.b = t2;
            rgb.g = t2 + t3;
          } else if (h < 120) {
            rgb.g = t1;
            rgb.b = t2;
            rgb.r = t1 - t3;
          } else if (h < 180) {
            rgb.g = t1;
            rgb.r = t2;
            rgb.b = t2 + t3;
          } else if (h < 240) {
            rgb.b = t1;
            rgb.r = t2;
            rgb.g = t1 - t3;
          } else if (h < 300) {
            rgb.b = t1;
            rgb.g = t2;
            rgb.r = t2 + t3;
          } else if (h < 360) {
            rgb.r = t1;
            rgb.g = t2;
            rgb.b = t1 - t3;
          } else {
            rgb.r = 0;
            rgb.g = 0;
            rgb.b = 0;
          }
        }
        return {
          r: Math.round(rgb.r),
          g: Math.round(rgb.g),
          b: Math.round(rgb.b)
        };
      },
      // 将 rgb 转换为 hex
      rgbToHex(rgb) {
        let hex = [rgb.r.toString(16), rgb.g.toString(16), rgb.b.toString(16)];
        hex.map(function(str, i) {
          if (str.length == 1) {
            hex[i] = '0' + str;
          }
        });
        return hex.join('');
      },
      // 将 hex 复制到设备剪贴板
      onClickCanvas() {
        uni.setClipboardData({
          data: "#" + this.hex,
        });
      }
    },
    computed: {
      rgb() {
        return this.HSBToRGB(this.hsb)
      },
      hex() {
        return this.rgbToHex(this.rgb)
      },
      panelColor() {
        return `background: #${this.hex}`
      },
      // 设置 canvas 的文本颜色
      canvasHexStyle() {
        for (let key in this.rgb) {
          if (this.rgb[key] >= 130) {
            return "color: black"
          }
        }
        return "color: white"
      },
    },
  }
</script>

...
脚本部分内容和前面章节定义的画布非常相似(又是提取组件的好机会),最主要的区别是多了个 HSBToRGB() 方法。这里新出现的色彩编码:HSB 色码, 三个字母分别代表色相、饱和度、明度。之所以会用到它,是因为 HSB 来推导同一色相的相似色比较方便,只需要保持 H 值不变,改变 S 和 B 即可。
此函数来源于 t-color-picker 插件。RGB/HSB 转换的推导过程这里就不展开讲了。
最后是样式的代码:
/* components/ColorPanel/ColorPanel.vue */

...

<style scoped>
  .container {
    display: flex;
    flex-direction: column;
    justify-content: center;
    text-align: center;
  }

  .rgb-text {
    font-size: 10px;
  }

  .panel {
    height: 60px;
    width: 100px;
    border-radius: 10px;
    border-color: #484848;
    border-style: dashed;
  }
</style>
像前面说的,基本上就是定义了一个圆角小方块,方块的颜色由脚本里绑定的样式动态改变。
测试下运行是否正常。在首页里随便找个位置写下代码:
<ColorPanel :hsb="{h: 10,s: 50,b: 50}"></ColorPanel>
顺利的话就会出现一个带有颜色的圆角小方块了。
让我们继续。
父组件
现在我们可以和之前章节一样,直接在 index.vue 里写逻辑,推导相似色并遍历出几十个小方块。
但是推导相似色这堆功能,全放在 index.vue 太臃肿了。因此继续封装,再创建一个 SimilarColors 组件,它通过 props 从上一级获取色码,并根据此色码推导相似色。
首先是模板:
<!-- components/SimilarColors/SimilarColors.vue -->

<template>
  <view class="content">
    <uni-row>
      <uni-col :xs="8" :sm="6" :md="4" :lg="3" :xl="2" v-for="(item, index) in similarColors" :key="index">
        <ColorPanel :hsb="item"></ColorPanel>
        <view style="padding-bottom: 10px;"></view>
      </uni-col>
    </uni-row>
  </view>
</template>

...
它将遍历 similarColors 状态,并将<ColorPanel> 组件以宫格的形式展示。
<uni-col>来自于uni-ui插件。插件的用法请参考官方文档。
接下来写脚本:
// components/SimilarColors/SimilarColors.vue

...

<script>
  export default {
    name: "SimilarColors",
    props: {
      rgb: {
        type: Object,
      },
    },
    computed: {
      // 根据props的rgb,获取hsb色码
      hsb() {
        const rgb = this.rgb
        let hsb = {
          h: 0,
          s: 0,
          b: 0
        };
        let min = Math.min(rgb.r, rgb.g, rgb.b);
        let max = Math.max(rgb.r, rgb.g, rgb.b);
        let delta = max - min;
        hsb.b = max;
        hsb.s = max != 0 ? 255 * delta / max : 0;
        if (hsb.s != 0) {
          if (rgb.r == max) hsb.h = (rgb.g - rgb.b) / delta;
          else if (rgb.g == max) hsb.h = 2 + (rgb.b - rgb.r) / delta;
          else hsb.h = 4 + (rgb.r - rgb.g) / delta;
        } else hsb.h = -1;
        hsb.h *= 60;
        if (hsb.h < 0) hsb.h = 0;
        hsb.s *= 100 / 255;
        hsb.b *= 100 / 255;
        return hsb;
      },
      // 推导相似色
      similarColors() {
        const {
          h,
          s,
          b
        } = this.hsb
        // 饱和度阶梯
        const Sstep = [100, 90, 80, 70, 60, 50, 40, 30, 20, 10]
        // 相似色数组
        let colors = []
        for (let item of Sstep) {
          colors.push({
            h: h,
            s: item,
            b: b
          })
        }
        // 明度阶梯
        const Bstep = [100, 90, 80, 70, 60, 50, 40, 30]
        for (let item of Bstep) {
          colors.push({
            h: h,
            s: s,
            b: item
          })
        }
        return colors
      },
    },
  }
</script>

...
-
计算属性 hsb()可将 RGB 转化为 HSB 色码,同样的,推导过程不展开了,有兴趣的读者自行搜索。 -
similarColors()根据 HSB 色码推导相似色。其原理很简单,保持 H 通道不变,修改其余两个通道即可。
然后,加上一点样式:
/* components/SimilarColors/SimilarColors.vue */

...

<style scoped>
  .content {
    padding-left: 20px;
  }
</style>
最后,只需要在 index.vue 合适的位置调用组件:
<!-- pages/index/index.vue -->

<template>
  <view>
    ...

    <!-- 相似色 -->
    <view class="padding-10">
      <sectionTitle num="02" title="相似色彩"></sectionTitle>
    </view>
    <SimilarColors :rgb="canvasColor"></SimilarColors>

  </view>
</template>

...
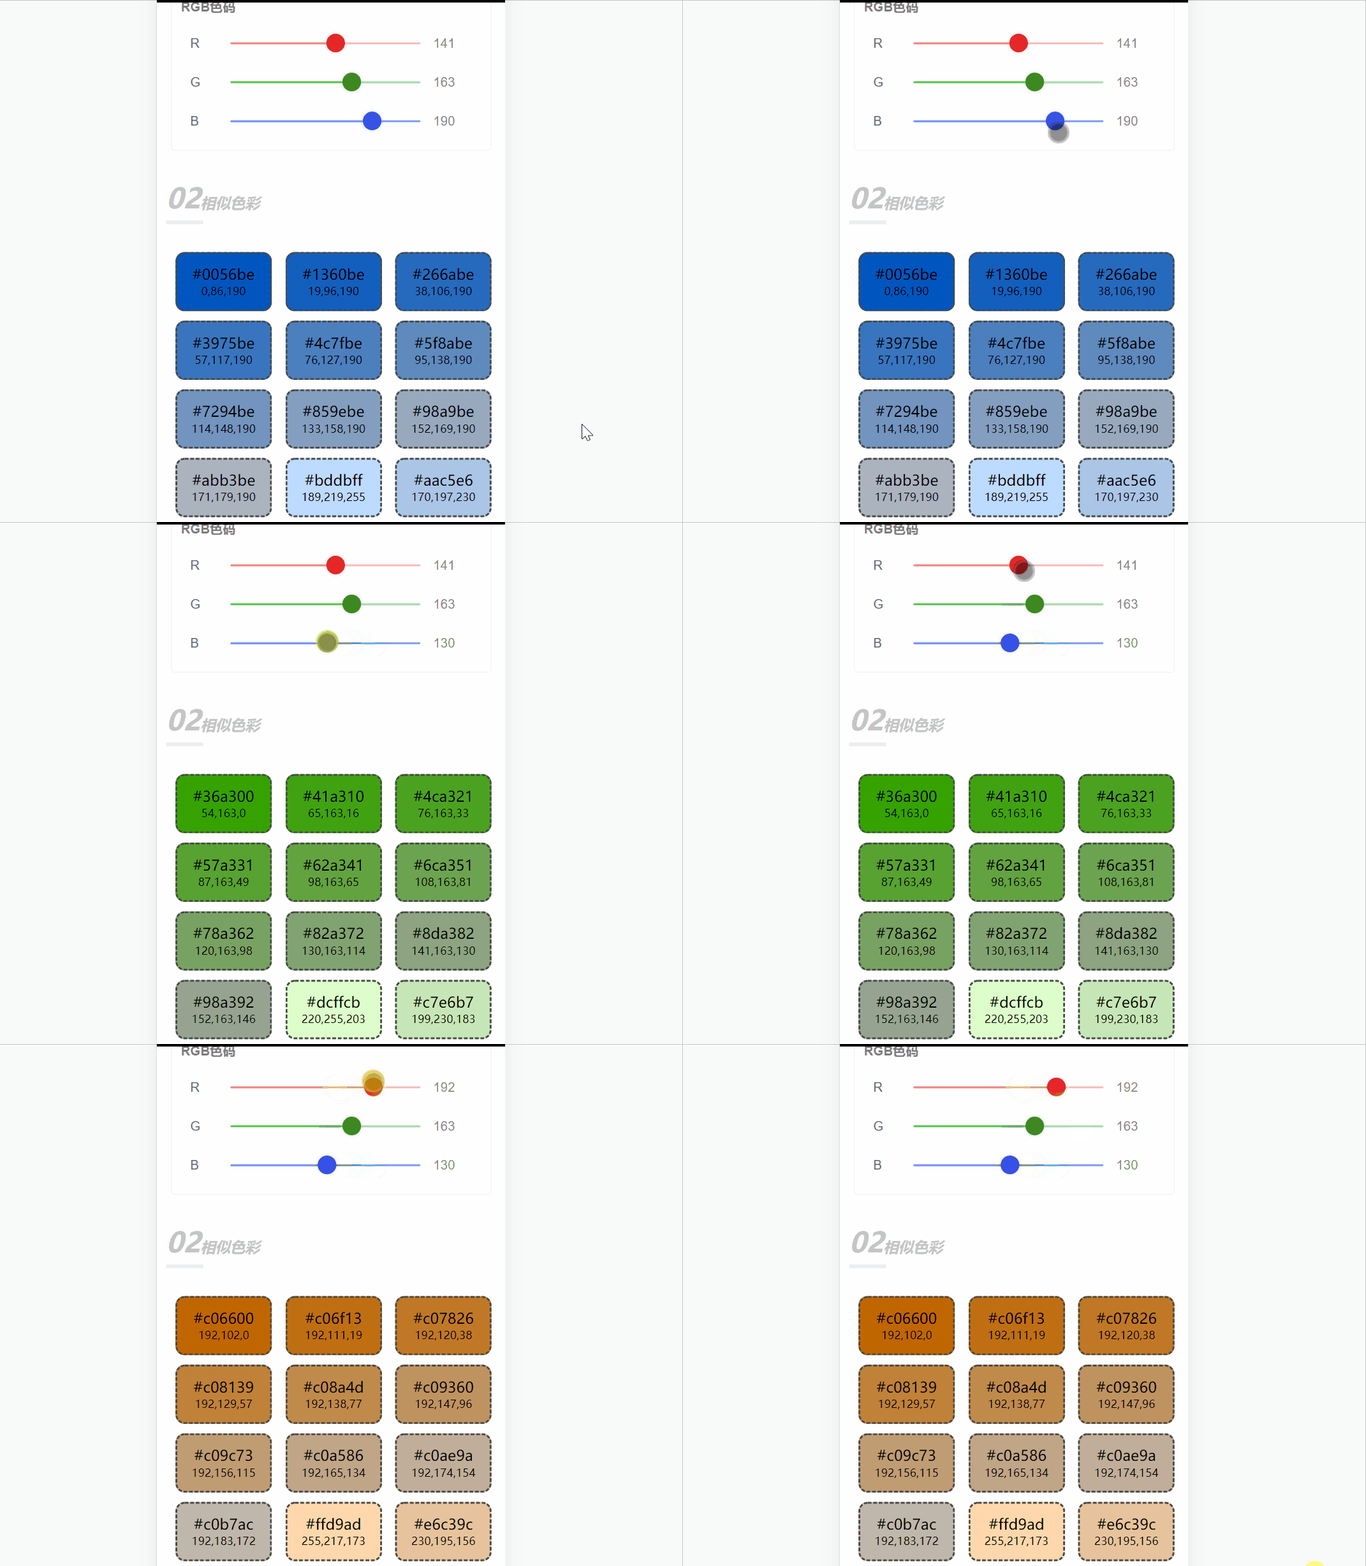
ok 了,看看效果:
修改画布颜色,下面的同一色系的相似色推荐就跟着变化。
是不是挺酷炫?
结语
首页的功能这样基本就完整了,小而精。
下一章节,我们将开发中国色和用户留言功能,给本教程收官。


文章评论