简介
colly是用 Go 语言编写的功能强大的爬虫框架。它提供简洁的 API,拥有强劲的性能,可以自动处理 cookie&session,还有提供灵活的扩展机制。
首先,我们介绍colly的基本概念。然后通过几个案例来介绍colly的用法和特性:拉取 GitHub Treading,拉取百度小说热榜,下载 Unsplash 网站上的图片。
快速使用
本文代码使用 Go Modules。
创建目录并初始化:
$ mkdir colly && cd colly
$ go mod init github.com/darjun/go-daily-lib/colly
安装colly库:
$ go get -u github.com/gocolly/colly/v2
使用:
package main

import (
  "fmt"

  "github.com/gocolly/colly/v2"
)

func main() {
  c := colly.NewCollector(
    colly.AllowedDomains("www.baidu.com" ),
  )

  c.OnHTML("a[href]", func(e *colly.HTMLElement) {
    link := e.Attr("href")
    fmt.Printf("Link found: %q -> %s\n", e.Text, link)
    c.Visit(e.Request.AbsoluteURL(link))
  })

  c.OnRequest(func(r *colly.Request) {
    fmt.Println("Visiting", r.URL.String())
  })

  c.OnResponse(func(r *colly.Response) {
    fmt.Printf("Response %s: %d bytes\n", r.Request.URL, len(r.Body))
  })

  c.OnError(func(r *colly.Response, err error) {
    fmt.Printf("Error %s: %v\n", r.Request.URL, err)
  })

  c.Visit("http://www.baidu.com/")
}
colly的使用比较简单:
首先,调用colly.NewCollector()创建一个类型为*colly.Collector的爬虫对象。由于每个网页都有很多指向其他网页的链接。如果不加限制的话,运行可能永远不会停止。所以上面通过传入一个选项colly.AllowedDomains("www.baidu.com")限制只爬取域名为www.baidu.com的网页。
然后我们调用c.OnHTML方法注册HTML回调,对每个有href属性的a元素执行回调函数。这里继续访问href指向的 URL。也就是说解析爬取到的网页,然后继续访问网页中指向其他页面的链接。
调用c.OnRequest()方法注册请求回调,每次发送请求时执行该回调,这里只是简单打印请求的 URL。
调用c.OnResponse()方法注册响应回调,每次收到响应时执行该回调,这里也只是简单的打印 URL 和响应大小。
调用c.OnError()方法注册错误回调,执行请求发生错误时执行该回调,这里简单打印 URL 和错误信息。
最后我们调用c.Visit()开始访问第一个页面。
运行:
$ go run main.go
Visiting http://www.baidu.com/
Response http://www.baidu.com/: 303317 bytes
Link found: "百度首页" -> /
Link found: "设置" -> javascript:;
Link found: "登录" -> https://passport.baidu.com/v2/?login&tpl=mn&u=http%3A%2F%2Fwww.baidu.com%2F&sms=5
Link found: "新闻" -> http://news.baidu.com
Link found: "hao123" -> https://www.hao123.com
Link found: "地图" -> http://map.baidu.com
Link found: "直播" -> https://live.baidu.com/
Link found: "视频" -> https://haokan.baidu.com/?sfrom=baidu-top
Link found: "贴吧" -> http://tieba.baidu.com
...
colly爬取到页面之后,会使用goquery解析这个页面。然后查找注册的 HTML 回调对应元素选择器(element-selector),将goquery.Selection封装成一个colly.HTMLElement执行回调。
colly.HTMLElement其实就是对goquery.Selection的简单封装:
type HTMLElement struct {
  Name string
  Text string
  Request *Request
  Response *Response
  DOM *goquery.Selection
  Index int
}
并提供了简单易用的方法:
-
Attr(k string):返回当前元素的属性,上面示例中我们使用e.Attr("href")获取了href属性; -
ChildAttr(goquerySelector, attrName string):返回goquerySelector选择的第一个子元素的attrName属性; -
ChildAttrs(goquerySelector, attrName string):返回goquerySelector选择的所有子元素的attrName属性,以[]string返回; -
ChildText(goquerySelector string):拼接goquerySelector选择的子元素的文本内容并返回; -
ChildTexts(goquerySelector string):返回goquerySelector选择的子元素的文本内容组成的切片,以[]string返回。 -
ForEach(goquerySelector string, callback func(int, *HTMLElement)):对每个goquerySelector选择的子元素执行回调callback; -
Unmarshal(v interface{}):通过给结构体字段指定 goquerySelector 格式的 tag,可以将一个 HTMLElement 对象 Unmarshal 到一个结构体实例中。
这些方法会被频繁地用到。下面我们就通过一些示例来介绍colly的特性和用法。
GitHub Treading
我之前写过一个拉取GitHub Treading 的 API,用colly更方便:
type Repository struct {
  Author  string
  Name    string
  Link    string
  Desc    string
  Lang    string
  Stars   int
  Forks   int
  Add     int
  BuiltBy []string
}

func main() {
  c := colly.NewCollector(
    colly.MaxDepth(1),
  )


  repos := make([]*Repository, 0, 15)
  c.OnHTML(".Box .Box-row", func (e *colly.HTMLElement) {
    repo := &Repository{}

    // author & repository name
    authorRepoName := e.ChildText("h1.h3 > a")
    parts := strings.Split(authorRepoName, "/")
    repo.Author = strings.TrimSpace(parts[0])
    repo.Name = strings.TrimSpace(parts[1])

    // link
    repo.Link = e.Request.AbsoluteURL(e.ChildAttr("h1.h3 >a", "href"))

    // description
    repo.Desc = e.ChildText("p.pr-4")

    // language
    repo.Lang = strings.TrimSpace(e.ChildText("div.mt-2 > span.mr-3 > span[itemprop]"))

    // star & fork
    starForkStr := e.ChildText("div.mt-2 > a.mr-3")
    starForkStr = strings.Replace(strings.TrimSpace(starForkStr), ",", "", -1)
    parts = strings.Split(starForkStr, "\n")
    repo.Stars , _=strconv.Atoi(strings.TrimSpace(parts[0]))
    repo.Forks , _=strconv.Atoi(strings.TrimSpace(parts[len(parts)-1]))

    // add
    addStr := e.ChildText("div.mt-2 > span.float-sm-right")
    parts = strings.Split(addStr, " ")
    repo.Add, _ = strconv.Atoi(parts[0])

    // built by
    e.ForEach("div.mt-2 > span.mr-3  img[src]", func (index int, img *colly.HTMLElement) {
      repo.BuiltBy = append(repo.BuiltBy, img.Attr("src"))
    })

    repos = append(repos, repo)
  })

  c.Visit("https://github.com/trending")

  fmt.Printf("%d repositories\n", len(repos))
  fmt.Println("first repository:")
  for _, repo := range repos {
      fmt.Println("Author:", repo.Author)
      fmt.Println("Name:", repo.Name)
      break
  }
}
我们用ChildText获取作者、仓库名、语言、星数和 fork 数、今日新增等信息,用ChildAttr获取仓库链接,这个链接是一个相对路径,通过调用e.Request.AbsoluteURL()方法将它转为一个绝对路径。
运行:
$ go run main.go
25 repositories
first repository:
Author: Shopify
Name: dawn
百度小说热榜
网页结构如下:
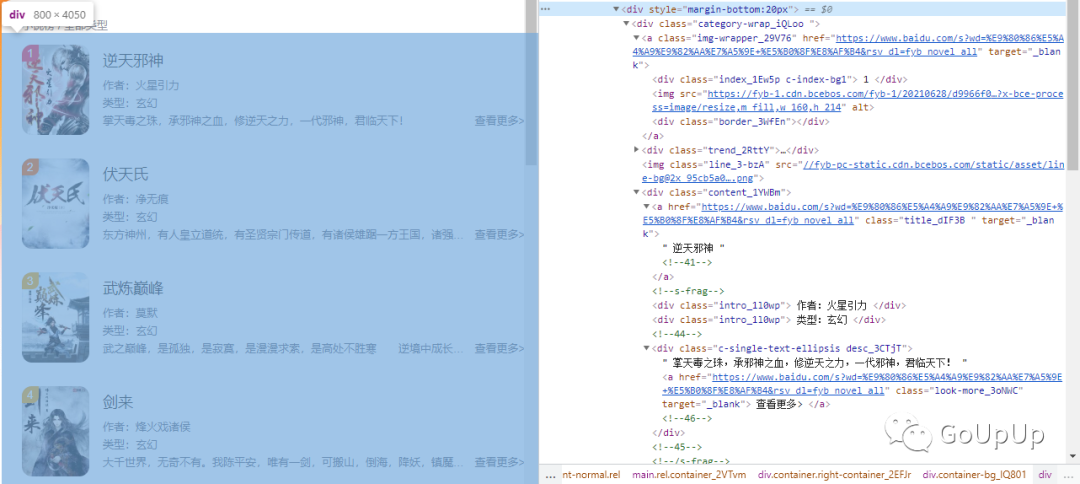
各部分结构如下:
-
每条热榜各自在一个 div.category-wrap_iQLoo中; -
a元素下div.index_1Ew5p是排名; -
内容在 div.content_1YWBm中; -
内容中 a.title_dIF3B是标题; -
内容中两个 div.intro_1l0wp,前一个是作者,后一个是类型; -
内容中 div.desc_3CTjT是描述。
由此我们定义结构:
type Hot struct {
  Rank   string `selector:"a > div.index_1Ew5p"`
  Name   string `selector:"div.content_1YWBm > a.title_dIF3B"`
  Author string `selector:"div.content_1YWBm > div.intro_1l0wp:nth-child(2)"`
  Type   string `selector:"div.content_1YWBm > div.intro_1l0wp:nth-child(3)"`
  Desc   string `selector:"div.desc_3CTjT"`
}
tag 中是 CSS 选择器语法,添加这个是为了可以直接调用HTMLElement.Unmarshal()方法填充Hot对象。
然后创建Collector对象:
c := colly.NewCollector()
注册回调:
c.OnHTML("div.category-wrap_iQLoo", func(e *colly.HTMLElement) {
  hot := &Hot{}

  err := e.Unmarshal(hot)
  if err != nil {
    fmt.Println("error:", err)
    return
  }

  hots = append(hots, hot)
})

c.OnRequest(func(r *colly.Request) {
  fmt.Println("Requesting:", r.URL)
})

c.OnResponse(func(r *colly.Response) {
  fmt.Println("Response:", len(r.Body))
})
OnHTML对每个条目执行Unmarshal生成Hot对象。
OnRequest/OnResponse只是简单输出调试信息。
然后,调用c.Visit()访问网址:
err := c.Visit("https://top.baidu.com/board?tab=novel")
if err != nil {
  fmt.Println("Visit error:", err)
  return
}
最后添加一些调试打印:
fmt.Printf("%d hots\n", len(hots))
for _, hot := range hots {
  fmt.Println("first hot:")
  fmt.Println("Rank:", hot.Rank)
  fmt.Println("Name:", hot.Name)
  fmt.Println("Author:", hot.Author)
  fmt.Println("Type:", hot.Type)
  fmt.Println("Desc:", hot.Desc)
  break
}
运行输出:
Requesting: https://top.baidu.com/board?tab=novel
Response: 118083
30 hots
first hot:
Rank: 1
Name: 逆天邪神
Author: 作者:火星引力
Type: 类型:玄幻
Desc: 掌天毒之珠,承邪神之血,修逆天之力,一代邪神,君临天下!  查看更多>
Unsplash
我写公众号文章,背景图片基本都是从 unsplash 这个网站获取。unsplash 提供了大量的、丰富的、免费的图片。这个网站有个问题,就是访问速度比较慢。既然学习爬虫,刚好利用程序自动下载图片。
unsplash 首页如下图所示:

网页结构如下:
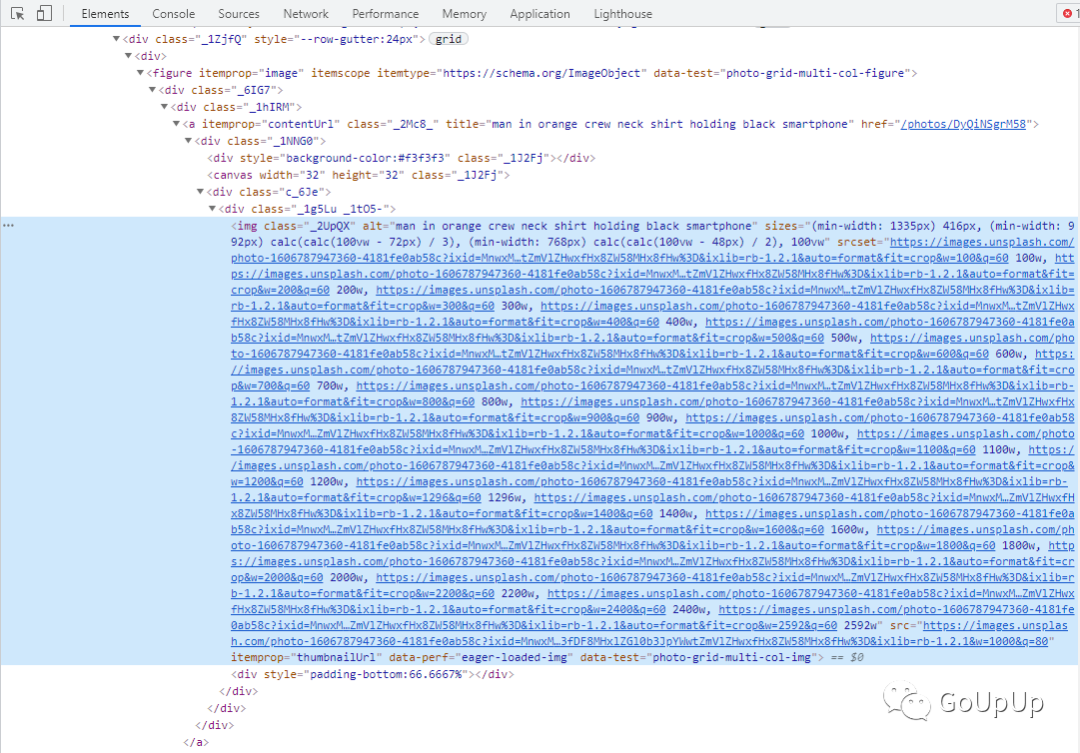
但是首页上显示的都是尺寸较小的图片,我们点开某张图片的链接:

网页结构如下:
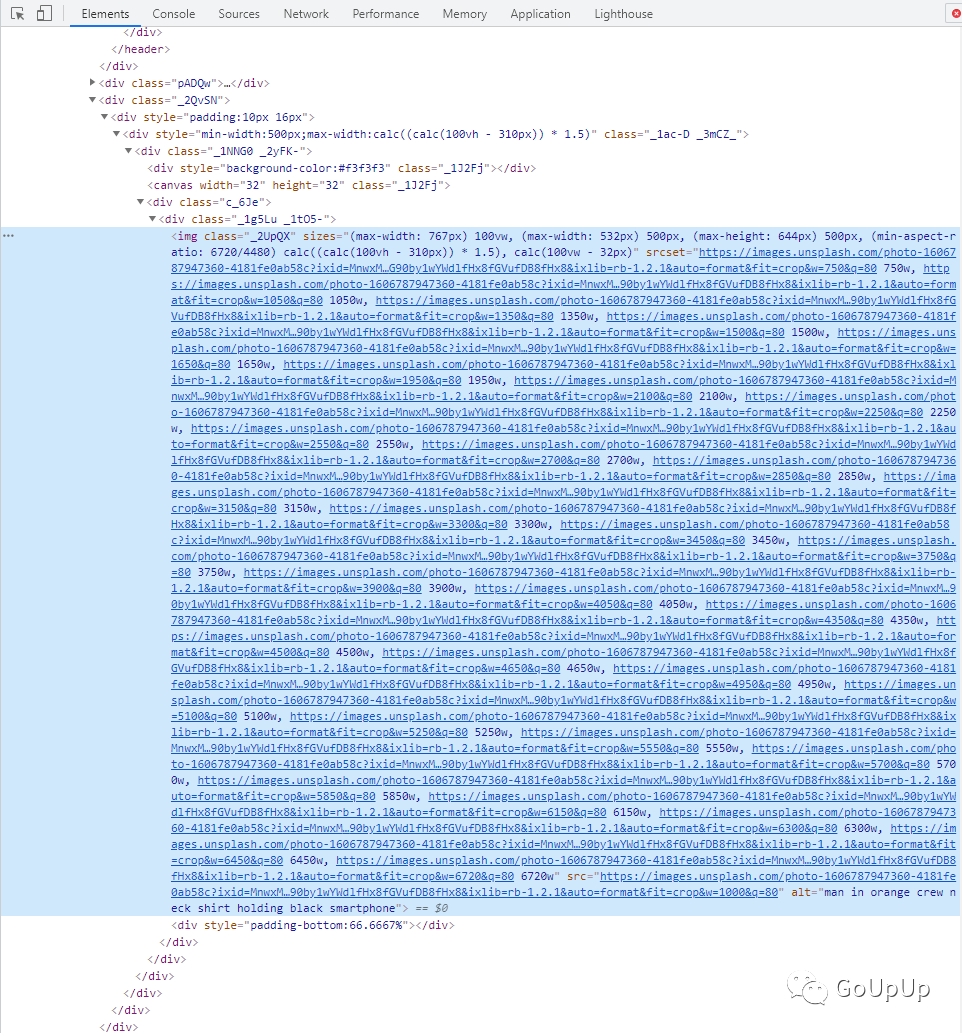
由于涉及三层网页结构(img最后还需要访问一次),使用一个colly.Collector对象,OnHTML回调设置需要格外小心,给编码带来比较大的心智负担。colly支持多个Collector,我们采用这种方式来编码:
func main() {
  c1 := colly.NewCollector()
  c2 := c1.Clone()
  c3 := c1.Clone()

  c1.OnHTML("figure[itemProp] a[itemProp]", func(e *colly.HTMLElement) {
    href := e.Attr("href")
    if href == "" {
      return
    }

    c2.Visit(e.Request.AbsoluteURL(href))
  })

  c2.OnHTML("div._1g5Lu > img[src]", func(e *colly.HTMLElement) {
    src := e.Attr("src")
    if src == "" {
      return
    }

    c3.Visit(src)
  })

  c1.OnRequest(func(r *colly.Request) {
    fmt.Println("Visiting", r.URL)
  })

  c1.OnError(func(r *colly.Response, err error) {
    fmt.Println("Visiting", r.Request.URL, "failed:", err)
  })
}
我们使用 3 个Collector对象,第一个Collector用于收集首页上对应的图片链接,然后使用第二个Collector去访问这些图片链接,最后让第三个Collector去下载图片。上面我们还为第一个Collector注册了请求和错误回调。
第三个Collector下载到具体的图片内容后,保存到本地:
func main() {
  // ... 省略
  var count uint32
  c3.OnResponse(func(r *colly.Response) {
    fileName := fmt.Sprintf("images/img%d.jpg", atomic.AddUint32(&count, 1))
    err := r.Save(fileName)
    if err != nil {
      fmt.Printf("saving %s failed:%v\n", fileName, err)
    } else {
      fmt.Printf("saving %s success\n", fileName)
    }
  })

  c3.OnRequest(func(r *colly.Request) {
    fmt.Println("visiting", r.URL)
  })
}
上面使用atomic.AddUint32()为图片生成序号。
运行程序,爬取结果:

异步
默认情况下,colly爬取网页是同步的,即爬完一个接着爬另一个,上面的 unplash 程序就是如此。这样需要很长时间,colly提供了异步爬取的特性,我们只需要在构造Collector对象时传入选项colly.Async(true)即可开启异步:
c1 := colly.NewCollector(
  colly.Async(true),
)
但是,由于是异步爬取,所以程序最后需要等待Collector处理完成,否则早早地退出main,程序会退出:
c1.Wait()
c2.Wait()
c3.Wait()
再次运行,速度快了很多?。
第二版
向下滑动 unsplash 的网页,我们发现后面的图片是异步加载的。滚动页面,通过 chrome 浏览器的 network 页签查看请求:
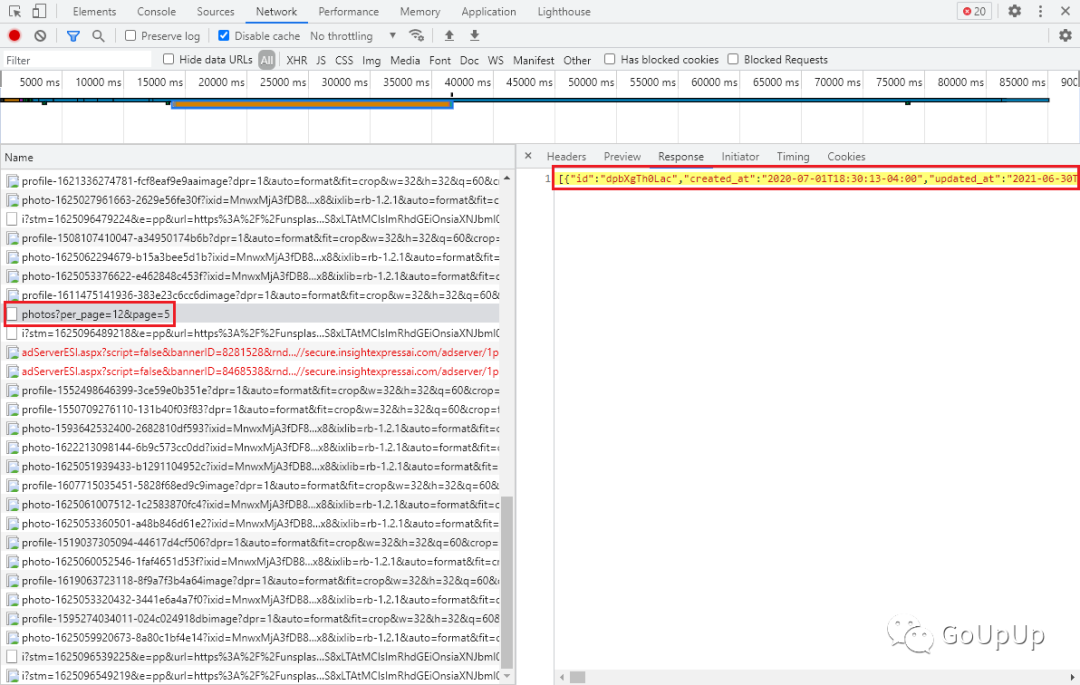
请求路径/photos,设置per_page和page参数,返回的是一个 JSON 数组。所以有了另一种方式:
定义每一项的结构体,我们只保留必要的字段:
type Item struct {
  Id     string
  Width  int
  Height int
  Links  Links
}

type Links struct {
  Download string
}
然后在OnResponse回调中解析 JSON,对每一项的Download链接调用负责下载图像的Collector的Visit()方法:
c.OnResponse(func(r *colly.Response) {
  var items []*Item
  json.Unmarshal(r.Body, &items)
  for _, item := range items {
    d.Visit(item.Links.Download)
  }
})
初始化访问,我们设置拉取 3 页,每页 12 个(和页面请求的个数一致):
for page := 1; page <= 3; page++ {
  c.Visit(fmt.Sprintf("https://unsplash.com/napi/photos?page=%d&per_page=12", page))
}
运行,查看下载的图片:

限速
有时候并发请求太多,网站会限制访问。这时就需要使用LimitRule了。说白了,LimitRule就是限制访问速度和并发量的:
type LimitRule struct {
  DomainRegexp string
  DomainGlob string
  Delay time.Duration
  RandomDelay time.Duration
  Parallelism    int
}
常用的就Delay/RandomDelay/Parallism这几个,分别表示请求与请求之间的延迟,随机延迟,和并发数。另外必须指定对哪些域名施行限制,通过DomainRegexp或DomainGlob设置,如果这两个字段都未设置Limit()方法会返回错误。用在上面的例子中:
err := c.Limit(&colly.LimitRule{
  DomainRegexp: `unsplash\.com`,
  RandomDelay:  500 * time.Millisecond,
  Parallelism:  12,
})
if err != nil {
  log.Fatal(err)
}
我们设置针对unsplash.com这个域名,请求与请求之间的随机最大延迟 500ms,最多同时并发 12 个请求。
设置超时
有时候网速较慢,colly中使用的http.Client有默认超时机制,我们可以通过colly.WithTransport()选项改写:
c.WithTransport(&http.Transport{
  Proxy: http.ProxyFromEnvironment,
  DialContext: (&net.Dialer{
    Timeout:   30 * time.Second,
    KeepAlive: 30 * time.Second,
  }).DialContext,
  MaxIdleConns:          100,
  IdleConnTimeout:       90 * time.Second,
  TLSHandshakeTimeout:   10 * time.Second,
  ExpectContinueTimeout: 1 * time.Second,
})
扩展
colly在子包extension中提供了一些扩展特性,最最常用的就是随机 User-Agent 了。通常网站会通过 User-Agent 识别请求是否是浏览器发出的,爬虫一般会设置这个 Header 把自己伪装成浏览器。使用也比较简单:
import "github.com/gocolly/colly/v2/extensions"

func main() {
  c := colly.NewCollector()
  extensions.RandomUserAgent(c)
}
随机 User-Agent 实现也很简单,就是从一些预先定义好的 User-Agent 数组中随机一个设置到 Header 中:
func RandomUserAgent(c *colly.Collector) {
  c.OnRequest(func(r *colly.Request) {
    r.Headers.Set("User-Agent", uaGens[rand.Intn(len(uaGens))]())
  })
}
实现自己的扩展也不难,例如我们每次请求时需要设置一个特定的 Header,扩展可以这么写:
func MyHeader(c *colly.Collector) {
  c.OnRequest(func(r *colly.Request) {
    r.Headers.Set("My-Header", "dj")
  })
}
用Collector对象调用MyHeader()函数即可:
MyHeader(c)
总结
colly是 Go 语言中最流行的爬虫框架,支持丰富的特性。本文对一些常用特性做了介绍,并辅之以实例。限于篇幅,一些高级特性未能涉及,例如队列,存储等。对爬虫感兴趣的可去深入了解。
大家如果发现好玩、好用的 Go 语言库,欢迎到 Go 每日一库 GitHub 上提交 issue?
参考
-
Go 每日一库 GitHub:https://github.com/darjun/go-daily-lib -
Go 每日一库之 goquery:https://darjun.github.io/2020/10/11/godailylib/goquery/ -
用 Go 实现一个 GitHub Trending API:https://darjun.github.io/2021/06/16/github-trending-api/ -
colly GitHub:https://github.com/gocolly/colly
我
我的博客:https://darjun.github.io
欢迎关注我的微信公众号【GoUpUp】,共同学习,一起进步~
文章评论