

Spring
Spring make java more simple;
Spring make java more modern;
Spring make java more reactive;
Spring make java more productive;
Spring make java more cloud-ready。
目的:解决企业应用开发的复杂性,简化应用程序的开发。
功能:使用基本的JavaBean代替EJB,并提供了更多的企业应用功能
范围:任何Java应用
核心点:Spring是一个轻量级控制反转(==IoC==)和面向切面(==AOP==)的容器框架。
-
Spring Framework -
Spring Boot -
Spring Cloud
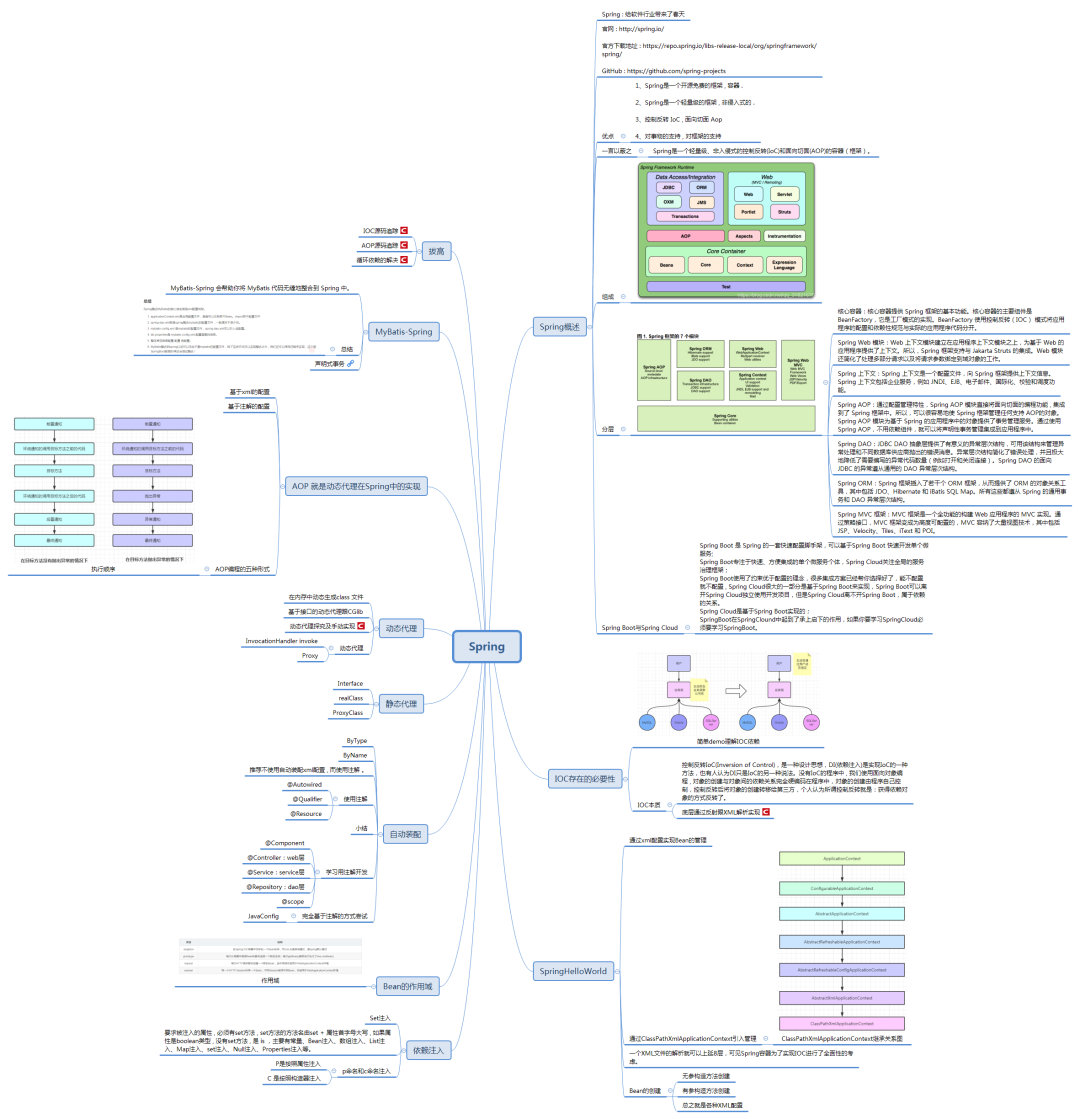
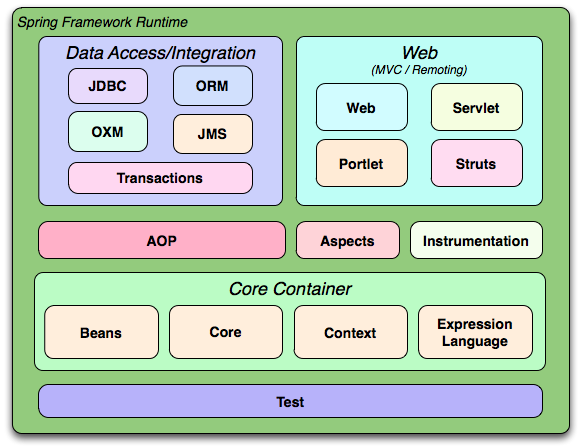
常规所说的 Spring 框架就是 Spring Framework,大约20个模块,主要包括:
Core Container(核心容器)
1、Core
2、Beans
3、Context
4、Expression Language (「SpEL」)
Core 和 Beans 是框架的基础,提供了 「IoC」 和 「DI」,以「工厂模式」的实现来完成配置和业务逻辑的「解藕」。IOC跟DI解释如下:
IOC容器(Inversion of Controller) 控制反转
Java思想是面向对象的开发,一个应用程序是由一组对象通过相互协作开发出的业务逻辑组成,那么如何管理这些对象,使他们高效地协作呢?抽象工厂、工厂方法设计模式”可以帮我们创建对象,“生成器模式”帮我们处理对象间的依赖关系,不也能完成这些功能吗?可是这些又需要我们创建另一些工厂类、生成器类,我们又要而外管理这些类,增加了我们的负担。所以用另外的方式,如果对象需要的时候,就自动地生成对象,不用再去创建。举个例子:原来我们饿了,就出去吃饭,但是现在有了外卖之后,就可以订餐了,我们可以把我们的需求告诉美团,让他们给我们送饭。这里主导关系发生了变化,原来是我们自己,但是现在是美团。Spring提出了一种思想:就是由spring来负责控制对象的生命周期和对象间的关系。所有的类都会在spring容器中登记,告诉spring你是个什么东西,你需要什么东西,然后spring会在系统运行到适当的时候,把你要的东西主动给你,同时也把你交给其他需要你的东西。所有的类的创建、销毁都由 spring来控制,也就是说控制对象生存周期的不再是引用它的对象,而是spring。对于某个具体的对象而言,以前是它控制其他对象,现在是所有对象都被spring控制,所以这叫控制反转(IOC)。当我们程序运行到需要某个对象到时候,会自动到实现依赖注入也就是DI。
Context :基于 Core 和 Beans,提供了大量的扩展,包括「国际化」操作(基于 JDK )、资源加载(基于 JDK properties)、数据校验(Spring 自己封装的数据校验机制)、数据绑定(Spring 特有,HTTP 请求中的参数直接映射称 POJO)、类型转换,「ApplicationContext」接口是 Context 的核心。
SpEL:Spring Expression Language 无非就是一些简单点Spring语法表达式如下:application.yml
server:port: 8181
public class HelloHandler{private String port;}
Data Access
-
DBC :连接数据库点框架如 JdbcTemplate
-
ORM :对象关系映射如 JPA、 JDO、 Hibernate、 MyBatis、 Spring Data JPA 底层是 Hibernate
-
OXM Object XML Mapping :这个主要是XML文件点解析
-
JMS Java :消息服务( Java Message Service , JMS )是一个 Java 标准,定义了使用消息代理的通用API
-
Transaction :数据库事务特性
Web
-
Web-Servlet,Spring Web MVC、WebSocket,Spring1- 4只有Web-Servlet
-
Web-Reactive,Spring Web Flux,Spring 5之后引入的
-
Web-Struts,对 Struts 框架的支持,但是现在已经被抛弃了
-
Spring 3 之后就抛弃了
AOP
将面向切面编程直接集成到了 Spring 中,进行面向切面的业务开发,事务管理。可以认为AOP是面向对象编程的一种补充。AOP(Aspect Oriented Programming)称为面向切面编程。
比如进行一个计算器的编写,需要实现加、减、乘、除四种简单的运算,编写四种不同的方法。还有另外的两个需求是在每种运算之前和运算之后需要打印日志进行记录,需要进行数字合规的校验。我们就得考虑如何能简单地实现呢?
就是得把日志记录和数据校验等可重用的功能模块分离出来,然后在程序的执行的合适的地方动态地植入这些代码并执行。
这样就简化了代码的书写,业务逻辑代码中没有参和通用逻辑的代码,业务模块更简洁,只包含核心业务代码。实现了业务逻辑和通用逻辑的代码分离,便于维护和升级,降低了业务逻辑和通用逻辑的耦合。
有人会想到把这些通用的功能整合到一个方法中,去调用,这样也是避免不了重复调用,并且在业务逻辑中添加额外的代码。Spring通过配置的方式,而且不需要在业务逻辑代码中添加任何额外代码,就可以很好地实现上述功能。
以上这种方式就是spring中实现的AOP:意思是面向切面编程,它提供从另一个角度来考虑程序结构以完善面向对象编程(相对于OOP),即可以通过==在编译期间、装载期间或运行期间实现在不修改源代码的情况下,给程序动态添加功能的一种技术==。
通俗点说就是把可重用的功能提取出来,然后将这些通用功能在合适的时候织入到应用程序中;比如安全,日记记录,这些都是通用的功能,我们可以把它们提取出来,然后在程序执行的合适地方织入这些代码并执行它们,从而完成需要的功能并复用了这些功能。
Test
Spring Boot Test 单元测试,软件开发过程中必备,并且阅读源码可以发现 SpringRunner 底层使用的是 「JUnit」
| Spring Framework | JDK |
|---|---|
| 1.x | 1.3:引入了动态代理机制,AOP 底层就是动态代理,所以 Spring 必须是 JDK 1.3 |
| 2.x | 1.4:正常升级 |
| 3.x | 5:引入注解,Spring 3 最低版本是 Java 5 ,从此以后不叫1.x 直接叫x |
| 4.x | 6:「Spring 4 是有划时代意义的版本」,开始支持 Spring Boot 1.X |
| 5.x | 8:lambda 表达式等功能 |
Spring 版本与 Java 版本的对应关系
目前Java 开发的标配:Spring Framwork 5、Spring Boot 2、JDK 8。

IoC
前置核心知识:反射 + xml解析。
XML 解析
IoC 读取 spring-ioc.xml 获取 bean 相关信息,类信息、属性值信息,xml解析就跟拨洋葱一样一层层地读取数据。
根据第 1 步获取的信息,动态创建对象
(1) 创建对象:通过==反射机制==获取到目标类的构造函数,调用构造函数;(2) 给对象赋值,下面是具体的实现。
spring-ioc.xml 文件如下:
<beans xmlns="http://www.springframework.org/schema/beans"xmlns:xsi="http://www.w3.org/2001/XMLSchema-instance"xmlns:context="http://www.springframework.org/schema/context"xmlns:aop="http://www.springframework.org/schema/aop"xmlns:p="http://www.springframework.org/schema/p"xsi:schemaLocation="http://www.springframework.org/schema/aop http://www.springframework.org/schema/aop/spring-aop-4.3.xsdhttp://www.springframework.org/schema/beans http://www.springframework.org/schema/beans/spring-beans-4.3.xsdhttp://www.springframework.org/schema/context http://www.springframework.org/schema/context/spring-context-4.3.xsd"><bean id="user" class="com.sowhat.demo.entity.User"><property name="id" value="1"></property><property name="name" value="张三"></property></bean><bean id="user2" class="com.sowhat.demo.entity.User"><property name="id" value="2"></property><property name="name" value="李四"></property></bean></beans>
User类
package com.sowhat.demo.entity;import lombok.Data;public class User {private Integer id;private String name;}
Spring 提供点解析API
package com.sowhat.demo;import com.sowhat.demo.entity.User;import com.sowhat.demo.ioc.MyClassPathXmlApplictionContext;import org.springframework.context.ApplicationContext;public class Test {public static void main(String[] args) {ApplicationContext applicationContext = new MyClassPathXmlApplictionContext("spring-ioc.xml");User user1 = (User) applicationContext.getBean("user");System.out.println(user1);User user2 = applicationContext.getBean(User.class);System.out.println(user2);}}
官方 ApplicationContext 接口查看
package org.springframework.context;import org.springframework.beans.factory.HierarchicalBeanFactory;import org.springframework.beans.factory.ListableBeanFactory;import org.springframework.beans.factory.config.AutowireCapableBeanFactory;import org.springframework.core.env.EnvironmentCapable;import org.springframework.core.io.support.ResourcePatternResolver;import org.springframework.lang.Nullable;public interface ApplicationContext extends EnvironmentCapable, ListableBeanFactory, HierarchicalBeanFactory, MessageSource, ApplicationEventPublisher, ResourcePatternResolver {String getId();String getApplicationName();String getDisplayName();long getStartupDate();ApplicationContext getParent();AutowireCapableBeanFactory getAutowireCapableBeanFactory() throws IllegalStateException;}
敲重点!!!
根据官方ApplicationContext实现 MyClassPathXmlApplictionContext,实现接口后我们只实现两个重要接口,
这里的核心思想无非也就是 「用XML将spring-ioc文件读取出来」,然后灵活「运用反射实现Class的对象class的创建」,然后根据class 返回创建好的Object。
package com.sowhat.demo.ioc;import com.sowhat.demo.entity.User;import org.dom4j.Document;import org.dom4j.DocumentException;import org.dom4j.Element;import org.dom4j.io.SAXReader;import org.springframework.beans.BeansException;import org.springframework.beans.factory.BeanFactory;import org.springframework.beans.factory.NoSuchBeanDefinitionException;import org.springframework.beans.factory.ObjectProvider;import org.springframework.beans.factory.config.AutowireCapableBeanFactory;import org.springframework.context.ApplicationContext;import org.springframework.context.MessageSourceResolvable;import org.springframework.context.NoSuchMessageException;import org.springframework.core.ResolvableType;import org.springframework.core.env.Environment;import org.springframework.core.io.Resource;import java.io.IOException;import java.lang.annotation.Annotation;import java.lang.reflect.Constructor;import java.lang.reflect.Field;import java.lang.reflect.Method;import java.util.*;public class MyClassPathXmlApplictionContext implements ApplicationContext {private static Map<String,Object> iocContainer;static {iocContainer = new HashMap<>();}public MyClassPathXmlApplictionContext(String path) {//解析 XML 将 XML 文件转换成一个对象SAXReader reader = new SAXReader();try {Document document = reader.read("src/main/resources/spring-ioc.xml");Element root = document.getRootElement();Iterator<Element> rootIter = root.elementIterator();Class clazz = null;while(rootIter.hasNext()){Element bean = rootIter.next();//id值、class值String id = bean.attributeValue("id");String className = bean.attributeValue("class");//1、创建对象//获取目标类的运行时类clazz = Class.forName(className);//获取无参构造函数Constructor constructor = clazz.getConstructor();//调用构造器创建对象Object object = constructor.newInstance();Iterator<Element> beanIter = bean.elementIterator();while(beanIter.hasNext()){Element property = beanIter.next();String name = property.attributeValue("name");String value = property.attributeValue("value");//获取 setter 方法//首字母变大写 JavaBean写法String methodName = "set"+name.substring(0,1).toUpperCase()+name.substring(1);//参数类型就是成员变量的类型Field field = clazz.getDeclaredField(name);Method method = clazz.getMethod(methodName,field.getType());//赋值Object propertyValue = value;switch (field.getType().getName()){case "java.lang.Integer":propertyValue = Integer.parseInt(value);break;}method.invoke(object,propertyValue);}iocContainer.put(id,object);}} catch (Exception e) {e.printStackTrace();}}// 根据Bean的名字获取@Overridepublic Object getBean(String s) throws BeansException {return iocContainer.get(s);}// 根据Bean的类型来获取,这里还可以判断如果容器中有两个相同类型对象,则报错@Overridepublic <T> T getBean(Class<T> aClass) throws BeansException {Collection values = iocContainer.values();for(Object object:values){if(object.getClass().equals(aClass)) return (T) object;}return null;}......不再显示}

AOP
前置知识:动态代理AOP的思路有点绕,不过只有一个重点,就是动态代理.
简单ADD方法:
package com.sowhat.demo.aop;public interface Cal {public int add(int num1,int num2);public int sub(int num1,int num2);public int mul(int num1,int num2);public int div(int num1,int num2);}
Spring 官方AOP注解实现
package com.sowhat.demo.aop;import org.aspectj.lang.JoinPoint;import org.aspectj.lang.annotation.AfterReturning;import org.aspectj.lang.annotation.Aspect;import org.aspectj.lang.annotation.Before;import org.springframework.stereotype.Component;import java.util.Arrays;public class LoggerAspect {/*** 打印日志*/public void before(JoinPoint joinPoint){String name = joinPoint.getSignature().getName();System.out.println(name+"方法的参数是"+ Arrays.toString(joinPoint.getArgs()));}public void afterReturn(JoinPoint joinPoint,Object result){String name = joinPoint.getSignature().getName();System.out.println(name+"方法的返回值是"+ result);}}
spring-aop.xml
<beans xmlns="http://www.springframework.org/schema/beans"xmlns:xsi="http://www.w3.org/2001/XMLSchema-instance"xmlns:context="http://www.springframework.org/schema/context"xmlns:aop="http://www.springframework.org/schema/aop"xmlns:p="http://www.springframework.org/schema/p"xsi:schemaLocation="http://www.springframework.org/schema/aop http://www.springframework.org/schema/aop/spring-aop-4.3.xsdhttp://www.springframework.org/schema/beans http://www.springframework.org/schema/beans/spring-beans-4.3.xsdhttp://www.springframework.org/schema/context http://www.springframework.org/schema/context/spring-context-4.3.xsd"><context:component-scan base-package="com.sowhat.demo"></context:component-scan><aop:aspectj-autoproxy></aop:aspectj-autoproxy></beans>
调用官方AOP
package com.sowhat.demo.aop;import org.springframework.context.ApplicationContext;import org.springframework.context.support.ClassPathXmlApplicationContext;public class Test {public static void main(String[] args) {ApplicationContext applicationContext = new ClassPathXmlApplicationContext("spring-aop.xml");Cal cal = applicationContext.getBean(Cal.class);System.out.println(cal.add(1,1));}}
敲重点!!!
自我实现AOP。
动态代理:
静态代理三要素:
-
接口函数 -
实现具体接口的业务类,包含业务具体方法 -
包装类,包含一个实现具体类,实现 类接口类,然后在接口类对前后实现对具体方法对调用包装。

-
.java 通过 javac 生成了 Java 二进制文件.class
-
*.class 文件被JVM加载到内存中,然后生成一个Class对象
-
通过Class对象new出我们经常用到的对象。
-
普通*.java文件编译成*class 文件
-
通过网络传速*class文件。
-
通过动态代理方式生成*class文件
动态代理刨析:
基本接口:
public interface IPerson {void say();}
业务实现类:
public class Man implements IPerson{public void say() {System.out.println("man say");}}
先新建一个类实现「InvocationHandler」,用来实现服务的类。
public class NormalHandler implements InvocationHandler {private Object target;public NormalHandler(Object target) {this.target = target;}public Object invoke(Object proxy, Method method, Object[] args) throws Throwable {L.d("man say invoked at : " + System.currentTimeMillis());method.invoke(target, args); // 服务类自动实现。return null;}}
「Proxy」的子类,来实现提供优质服务的类对象。
Man man = new Man();NormalHandler normalHandler = new NormalHandler(man);AnnotationHandler annotationHandler = new AnnotationHandler();IPerson iPerson = (IPerson)// 通过此方法获得动态代理对象Proxy.newProxyInstance(IPerson.class.getClassLoader(),new Class[] {IPerson.class, IAnimal.class}, annotationHandler);iPerson.say();
通过「getProxyClass0」来生成字节码文件并且生成Class 对象。
private static final Class<?>[] constructorParams ={ InvocationHandler.class };public static Object newProxyInstance(ClassLoader loader,Class<?>[] interfaces,InvocationHandler h)throws IllegalArgumentException{Class<?> cl = getProxyClass0(loader, intfs); //生成字节码跟Class 对象 这是重点...final Constructor<?> cons = cl.getConstructor(constructorParams);// 获得构造器if (!Modifier.isPublic(cl.getModifiers())) {AccessController.doPrivileged(new PrivilegedAction<Void>() {public Void run() {cons.setAccessible(true);return null;}});}return cons.newInstance(new Object[]{h}); //new 出一个实例}
Class文件生成:
private static Class<?> getProxyClass0(ClassLoader loader,Class<?>... interfaces) {if (interfaces.length > 65535) {throw new IllegalArgumentException("interface limit exceeded");}// If the proxy class defined by the given loader implementing// the given interfaces exists, this will simply return the cached copy;// otherwise, it will create the proxy class via the ProxyClassFactoryreturn proxyClassCache.get(loader, interfaces);}--------public V get(K key, P parameter) {Objects.requireNonNull(parameter);expungeStaleEntries();Object cacheKey = CacheKey.valueOf(key, refQueue);// lazily install the 2nd level valuesMap for the particular cacheKeyConcurrentMap<Object, Supplier<V>> valuesMap = map.get(cacheKey);if (valuesMap == null) {ConcurrentMap<Object, Supplier<V>> oldValuesMap= map.putIfAbsent(cacheKey,valuesMap = new ConcurrentHashMap<>());if (oldValuesMap != null) {valuesMap = oldValuesMap;}}// 上面的方法是先看到我们一个缓存中是否存在已生成的Class 对象。// create subKey and retrieve the possible Supplier<V> stored by that// subKey from valuesMap// 通过下面的apply 生成我们的代理类,Object subKey = Objects.requireNonNull(subKeyFactory.apply(key, parameter));Supplier<V> supplier = valuesMap.get(subKey);Factory factory = null;------ProxyClassFactory 类下面的 apply 是动态代理的核心里面会遍历然后判断我们的接口,/** Choose a name for the proxy class to generate.*/long num = nextUniqueNumber.getAndIncrement(); // 生成随机数字String proxyName = proxyPkg + proxyClassNamePrefix(其实=$proxy) + num;/** Generate the specified proxy class. 生成二进制的代理类字节数组*/byte[] proxyClassFile = ProxyGenerator.generateProxyClass(proxyName, interfaces, accessFlags);return defineClass0(loader, proxyName,proxyClassFile, 0, proxyClassFile.length)// 通过字节码拿到 Class 对象, 这是调用native 方法。
生成的字节码数组文件我们可以导出到本地,然后通过Java反编译工具可以看到重写的方法其实调用的是this.h.invoke(),其中h就是InvocationHandler的一个实例,
模拟实现AOP功能:
package com.sowhat.demo.aop;import org.springframework.aop.framework.AopProxy;import java.io.Serializable;import java.lang.reflect.InvocationHandler;import java.lang.reflect.Method;import java.lang.reflect.Proxy;import java.util.Arrays;public class MyJdkDynamicAopProxy implements AopProxy, InvocationHandler, Serializable {//目标对象private Object target;/*** 接收目标对象* 返回动态代理对象** @return*/public Object bind(Object target) {this.target = target;//调用getProxyreturn this.getProxy(MyJdkDynamicAopProxy.class.getClassLoader()); // 这里就是个随便的类加载器 将我们动态创建的类加载到JVM}/*** 业务代码的执行* 日志的输出 当我们调用函数当时候会自动调用invoke** @param proxy* @param method* @param args* @throws Throwable*/public Object invoke(Object proxy, Method method, Object[] args) throws Throwable {System.out.println(method.getName() + "的参数是" + Arrays.toString(args));Object result = method.invoke(target, args);System.out.println(method.getName() + "的结果是" + result);return result;}public Object getProxy() {return null;}public Object getProxy(ClassLoader classLoader) {return Proxy.newProxyInstance(classLoader, target.getClass().getInterfaces(), this);}}


更多精彩推荐 ☞开发者抢茅台软件霸榜GitHub后;双十一“套路”多,京东天猫唯品会被罚;4MLinux新版发布|极客头条
点分享 点收藏 点点赞 点在看


文章评论